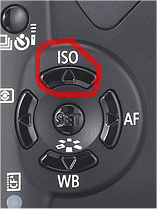
To change the ISO setting on your SLR camera, press the ISO button then use the 'up down left and right buttons' to change the speed. Again, if you don't have this option refer to your cameras manual as it may be slightly different between brands.
 Note: When your digital camera is in automatic mode, the ISO speed is chosen for you to suit the level of light available at that particular time.
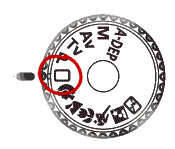
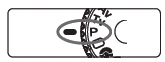 A manual mode I photograph in quite often is called Program AE. With Program AE you can choose the ISO you wish to photograph in and the digital camera then sets theshutter speed and aperture (exposure) automatically to suit. I like to think of it as being similar to an ISO priority option. To use Program AE change your mode dial to P, like the example image on the right.
If you're a beginner in using an SLR camera, you'll find it takes some time to get used to setting your ISO correctly. I can't count how many times I've kept my ISO at 100 and tried taking a fast night shot to find the photo turning out completely black. However after six months or so taking photographs in all different situations, you'll soon find it becomes second nature. Like anything new, it just takes practise.
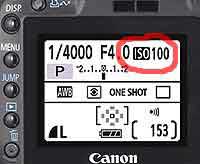 The most common ISO speed settings are: 100, 200, 400 and 800. Depending on your digital camera model you may also have them in the range of 64, 100, 160, 200, 400, 640, 800, 1600.
 The best way to do this is to set it on fully automatic. Look for a symbol on your camera's mode dial that looks like a rectangle. When your camera is on automatic, all important settings such as